Thursday, October 27, 2011

More French Translations for Earlier Posts

I wanted to again thank Franck SATAUD for the additional French translations.

They are available below as downloadable PDF files:

using_a_sphere_french_translation.pdf


Thursday, October 13, 2011

2012 Florida Workshops

I am pleased to announce that I will again be hosting two 10 day workshops in the Fort Myers, Florida area. The workshop will be held at my previous studio location (some of you may know that I have set up a new home studio) that is close to Sanibel Island and Fort Myers Beach.

The first will be focusing on still life painting while the second will focus on portrait painting. My goal is to sharing a wealth of information in the form of demonstrations, group lectures/discussions and individual feedback sessions, all while striving for an intimate and relaxed atmosphere.

I look forward to working with everyone who can attend!


"Still Life Painting in Oil" 10-Day Workshop
Date: March 12 - 16, 19 - 23, 2012
Location: Fort Myers, FL
Click "here" for further information regarding enrollment.


"Portrait Painting in Oil" 10 Day Workshop
Date: April 16 - 25, 23 - 27, 2012
Location: Fort Myers, FL
Click "here" for further information regarding enrollment.


Tuesday, October 11, 2011

French Translations for Posts on Ellipses

I wanted to make a quick post extending my thanks to Frank SATAUD who voluntarily translated my last two posts on ellipses into French and then offered to share those translations for French readers of the blog.

They are available below as downloadable PDF files.

Accurate Ellipses- Part 1

Expanding on Accurate Ellipses - Part 2

Monday, September 26, 2011

Expanding on Accurate Ellipses

(UPDATE 10/11/11 -For French translation of this post please click "here.")

For this post I wanted to expand on my previous post that addressed drawing ellipsesan element so critical to my own paintings.  In the previous post I illustrated the “major” and “minor” axes of an ellipse, showed that an ellipse or circle in perspective could be constructed at the picture plane, and offered a geometrical construct to aid us in drawing ellipses regardless if they are 2-dimensional (at the picture plane) or in perspective.  If the reader is unfamiliar with those items reading the previous post might prove useful before going further.  Here is a link to the previous post:


After drawing or painting a great number of still-life elements it becomes evident that the placement and orientation of the major and minor axes are critical to constructing an accurate ellipse within a drawing or painting.  In my own work I largely free hand the drawing rather than setting up a careful perspective framework and then make use of my perspective knowledge to inform and correct the decisions I make. 

Before going further I should clarify that the following discussion addresses circular, cylindrically shaped objects (cylinders with cross sections that form perfect circles) rather than forms derived from elliptical cylinders, also know as “cylindroids,” whose cross sections are elliptical.  It should also hold true for right angle cones that have circular cross sections. 


When perceiving an ellipse that belongs to these types of objects, we need to find the orientation of the minor axis for that ellipse.  Knowing this will in turn let us find the major axis of the same ellipse.  One way to find the minor axis of one of these ellipses is to first find the center axis of the object—that is the axis running through the object perpendicular to its ends.  The following image shows this axis for a simple cylinder.


Once we know this center axis spatially we need to visualize the angle or line that we would perceive at the picture plane for this axis.  This will also be the visual line of symmetry for the outside contour or silhouette of the object.    


Working 2-dimensionally at the picture plane, this line will run through the minor axis of any ellipses we might need to draw for that object.  We then know that the major axis will run perpendicular to the line we found.  Now that we know the orientation of both axes, once we visually determine their lengths we can construct a perfect ellipse for any of the circles that we see in perspective!


This all might seem rather self evident for a glass of water sitting upright directly in front of you but as you encounter cylindrically based objects that are spatially rotated to more unconventional positions guessing the orientation of the major and minor axes can at times become rather tricky and I have found that this simple understanding and assessment greatly aids me in my own work.  Here are some cylinders (and a cone) to illustrate a few more examples:


Thanks for taking a look!


Monday, August 8, 2011

Accurate Ellipses

(UPDATE 10/11/11 -For French translation of this post please click "here.") 

I finished up teaching a still life workshop at the Grand Central Academy of Art about a week ago.  While there one of the items we discussed were drawing accurate ellipses in our still-lifes.  I thought I would share some of that information here.  This information has been of great use to me while drawing cylindrically based objects such as cups and jars in my own still-lifes 

One of the first things we need to know is some terminology pertaining to ellipses.  The widest distance across an ellipse is known as the "major axis" while the shortest distance is known as the "minor axis."  For a circle the major axis and the minor axis would be the same distance.


With this shared terminology, it is interesting to note that if we take an ellipse and place it in perspective the resulting curvature we perceive is no different than if we were to construct an ellipse at the "picture plane" using the dimensions of the major and minor axes as they appear at this picture plane.  The image below shows a circle in perspective on the left and the resulting ellipse that we would see at the picture plane on the right. The curvature of both are the same. 


As a quick side note, for those of you unfamiliar with the term picture plane, in perspective it is the imaginary flat surface that is located between the viewer and the object being viewed.  The drawing below from G.A. Storey's 1910 book, The Theory and Practice of Perspective gives a good visualization for imagining a picture plane.
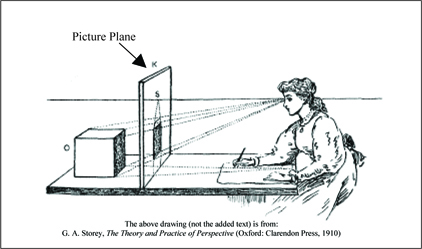

Returning to our ellipses, because the ellipse found in perspective and the ellipse constructed at the picture plane both create the same curvature we don't actually have to construct the circles or ellipses we see within our still-lifes in perspective—it should however be noted that the ability to do so is a valuable aid to our conceptual comprehension.  Instead, and here is the important part, to draw a ellipse or circle being viewed in perspective we only need to know the dimensions of the major and minor axes as they are perceived at the picture plane.  With these dimensions we can correctly construct an ellipse at the picture plane which will correspond to the ellipse or circle being viewed in perspective.

With this knowledge in tow, for now let us only work at the picture plane and construct an ellipse.  There are many ways to construct ellipses yet there are two main ways that I usually find myself constructing them (or very often correcting freehanded versions of them).  If they are rather small I often just draw the major and minor axes in and then carefully freehand the ellipse checking the symmetry of both sides as I go.    


For larger ellipses I construct the following geometrical frame work which gives me 12 points along the ellipse to guide any freehanded approximations.  

To make the framework I need to first create a rectangle with the proportions of the major and minor axes of the ellipse.  I then need to divide this rectangle into 16 equal sections.  To make these sections it is useful to remember that a simple “X” created from diagonal corners of the rectangle will always find the center of that rectangle.  Along the way we will also gain 4 of our 12 points that make up the ellipse.


At this point we now know 4 of our points and we have divided our rectangle into 4 equal sections.  We now need to divide each of those sections into four more sections.


We now have 16 equal sections.  However, before going further let's remove the diagonals used in constructing those sections to keep things from getting too visually confusing.


To find the remaining 8 additional points we need to run diagonal lines across the 4 outer sections along each side. Next note where these diagonals intersect the boundaries between the outer four sections of that particular side.  At these intersections, the one that is the closest to the outside of our original rectangle will also mark a point along our ellipse.  Let's start with the bottom section.


Now for the top section.


The right section.


And finally the left section.


Once again, for clarity let's remove the diagonals used to find the additional points.


And finally we now have 12 points we can use to aid us in drawing our ellipse!


Leaving the picture plane behind, it is useful to know that this same process works just as well to draw ellipses or circles that are in perspective.


This knowledge has been a resource which I have found very useful in my drawings and paintings.  After a couple of times rehearsing the process it becomes fairly easy to commit to memory.  Additionally, after constructing a number of ellipses in this formal and structured way I suspect that most people will begin to get more accurate results when free-handing them without such a complex framework. 

Going even further, some of you may have already picked up on the fact that the ellipses I have shown in perspective have thus far been in one point perspective with an ellipse that would be directly in front of us (the viewer).   It is interesting to note what happens when the ellipse is moved left or right from this center position. In doing so the major and minor axes of the ellipse (as seen at the picture plane) will begin to rotate.  They do however continue to stay perpendicular to one another.   


There is still plenty more to share on this subject however my busy schedule means that I will have to return to the subject at another time.  Yet I hope some of you will benefit from what I have been able to share.  And as always, thanks for visiting.

Did you enjoy this post?

Join My E-mail List


Thursday, June 30, 2011

Returning to the Blog—A Few New Paintings to Share

Owing to a number of business and personal related obligations I haven't been able to post in quite a few months.  During that time I have received a number of questions that would be great to answer via the blog.  With these in mind, I am hoping to make a return to posting more regularly. 

I thought I would get back into things with a few recent paintings.  The second and third of these were started as demonstrations during workshops I taught earlier this year.  These particular pieces have already found homes with collectors and so are no longer available, however I hope you enjoy getting to see them.

Thanks for stopping by!

 
"Planes" 8" x 16" oil on linen


"Sand Dollars and Glass" 8" x 10" oil on mounted linen


"Apples and Measuring Cups" 8" x 10" oil on mounted linen