Monday, August 8, 2011

Accurate Ellipses

(UPDATE 10/11/11 -For French translation of this post please click "here.") 

I finished up teaching a still life workshop at the Grand Central Academy of Art about a week ago.  While there one of the items we discussed were drawing accurate ellipses in our still-lifes.  I thought I would share some of that information here.  This information has been of great use to me while drawing cylindrically based objects such as cups and jars in my own still-lifes 

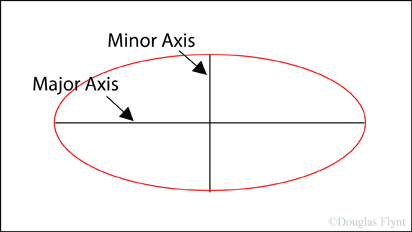
One of the first things we need to know is some terminology pertaining to ellipses.  The widest distance across an ellipse is known as the "major axis" while the shortest distance is known as the "minor axis."  For a circle the major axis and the minor axis would be the same distance.

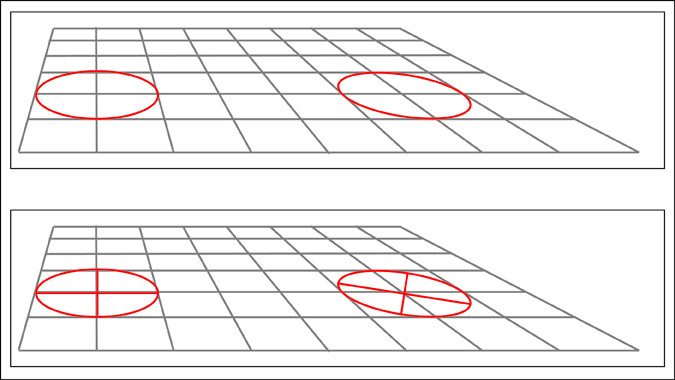
With this shared terminology, it is interesting to note that if we take an ellipse and place it in perspective the resulting curvature we perceive is no different than if we were to construct an ellipse at the "picture plane" using the dimensions of the major and minor axes as they appear at this picture plane.  The image below shows a circle in perspective on the left and the resulting ellipse that we would see at the picture plane on the right. The curvature of both are the same. 


As a quick side note, for those of you unfamiliar with the term picture plane, in perspective it is the imaginary flat surface that is located between the viewer and the object being viewed.  The drawing below from G.A. Storey's 1910 book, The Theory and Practice of Perspective gives a good visualization for imagining a picture plane.
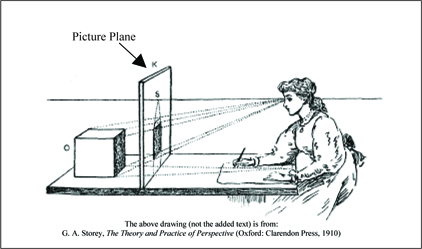

Returning to our ellipses, because the ellipse found in perspective and the ellipse constructed at the picture plane both create the same curvature we don't actually have to construct the circles or ellipses we see within our still-lifes in perspective—it should however be noted that the ability to do so is a valuable aid to our conceptual comprehension.  Instead, and here is the important part, to draw a ellipse or circle being viewed in perspective we only need to know the dimensions of the major and minor axes as they are perceived at the picture plane.  With these dimensions we can correctly construct an ellipse at the picture plane which will correspond to the ellipse or circle being viewed in perspective.

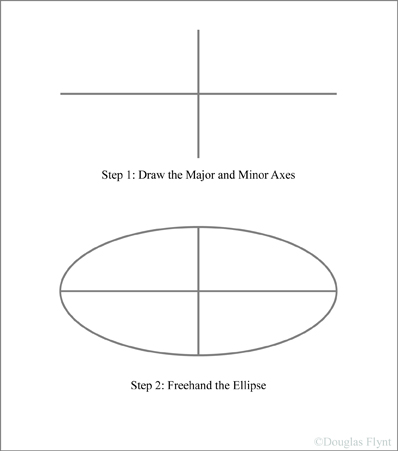
With this knowledge in tow, for now let us only work at the picture plane and construct an ellipse.  There are many ways to construct ellipses yet there are two main ways that I usually find myself constructing them (or very often correcting freehanded versions of them).  If they are rather small I often just draw the major and minor axes in and then carefully freehand the ellipse checking the symmetry of both sides as I go.    

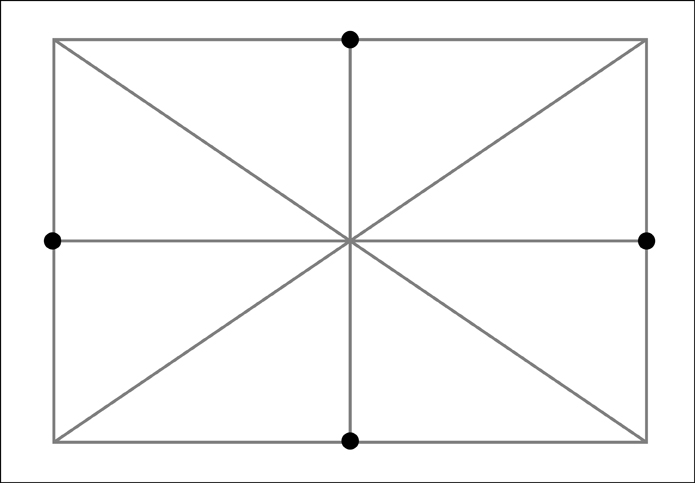
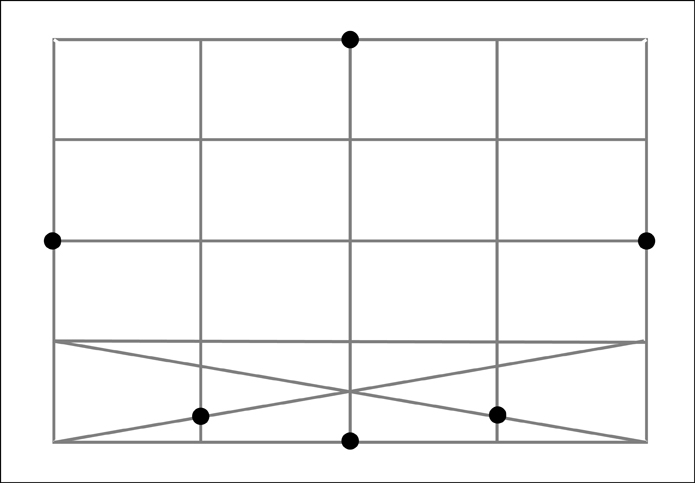
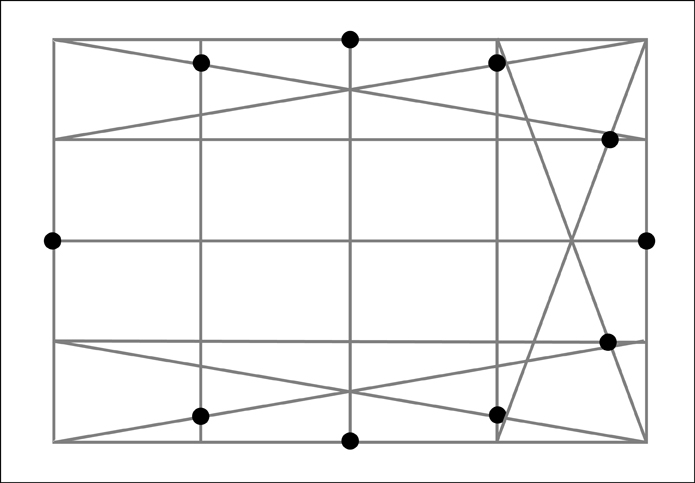
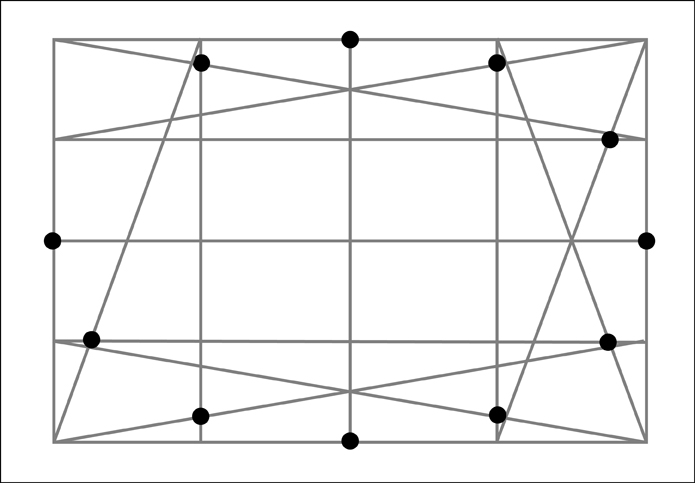
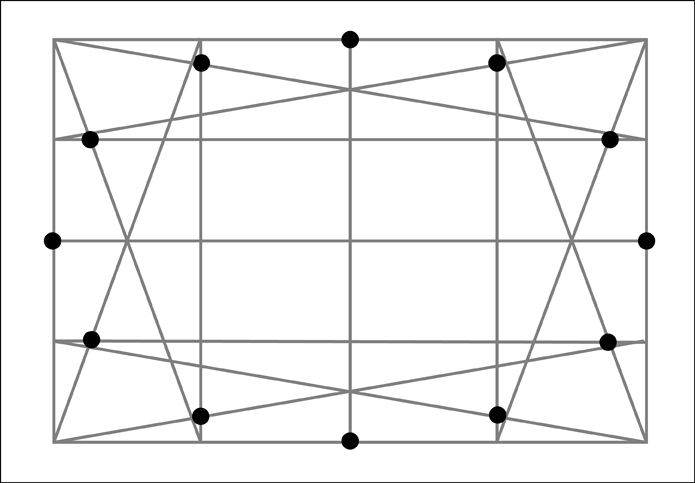
For larger ellipses I construct the following geometrical frame work which gives me 12 points along the ellipse to guide any freehanded approximations.  
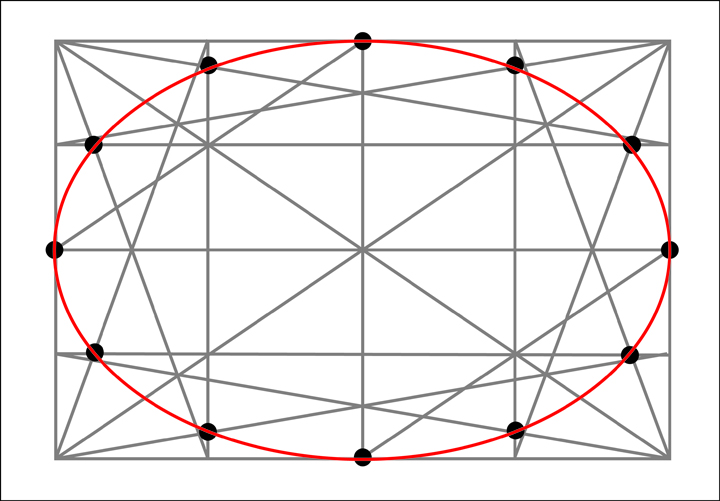
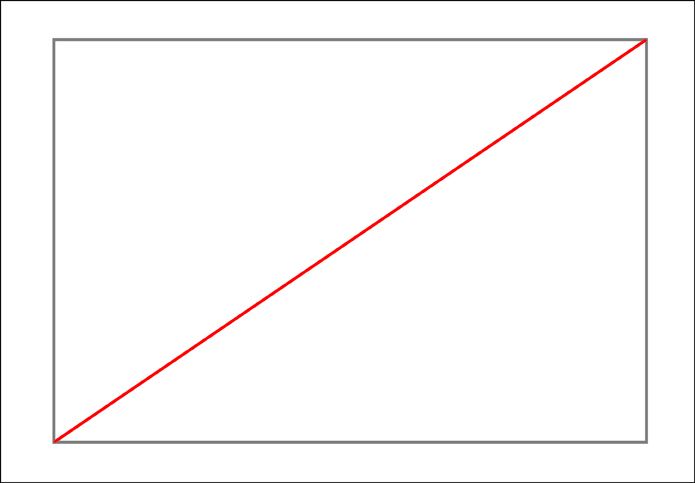
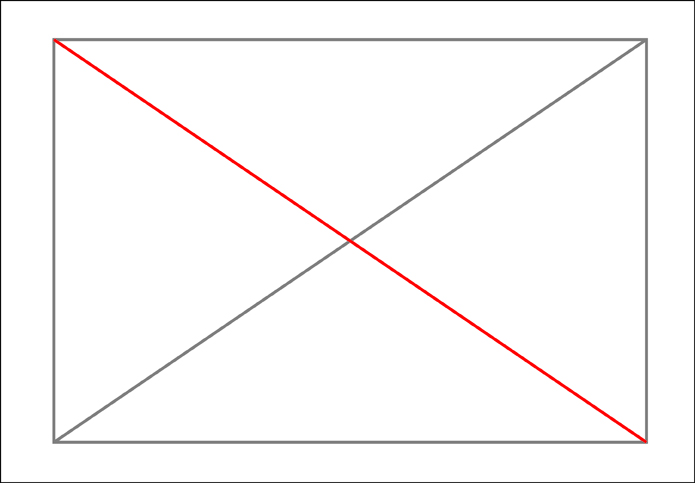
To make the framework I need to first create a rectangle with the proportions of the major and minor axes of the ellipse.  I then need to divide this rectangle into 16 equal sections.  To make these sections it is useful to remember that a simple “X” created from diagonal corners of the rectangle will always find the center of that rectangle.  Along the way we will also gain 4 of our 12 points that make up the ellipse.


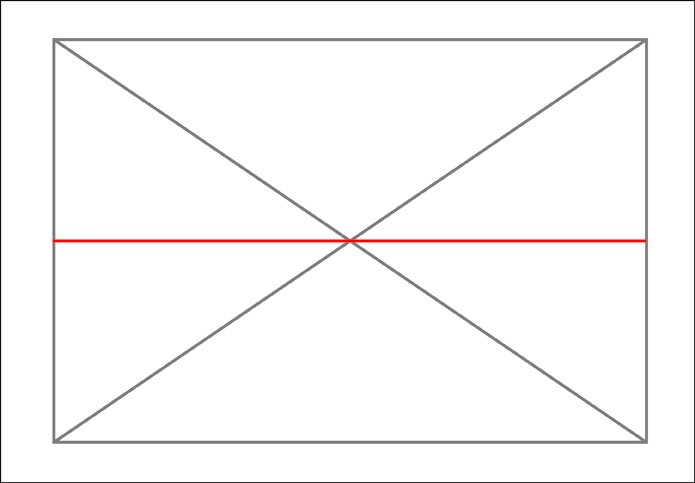
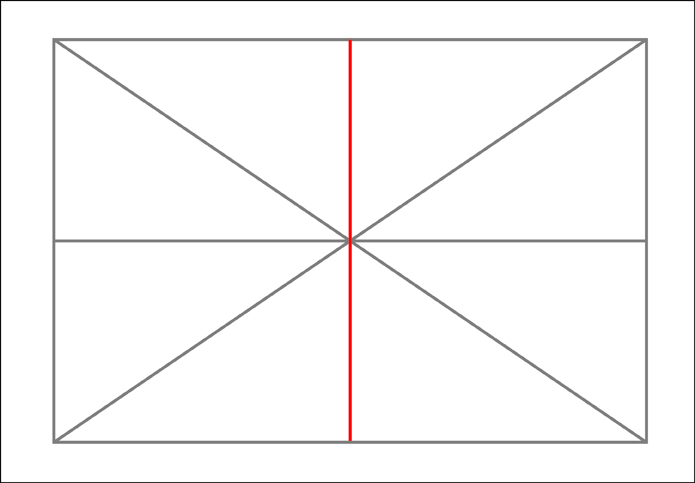
At this point we now know 4 of our points and we have divided our rectangle into 4 equal sections.  We now need to divide each of those sections into four more sections.
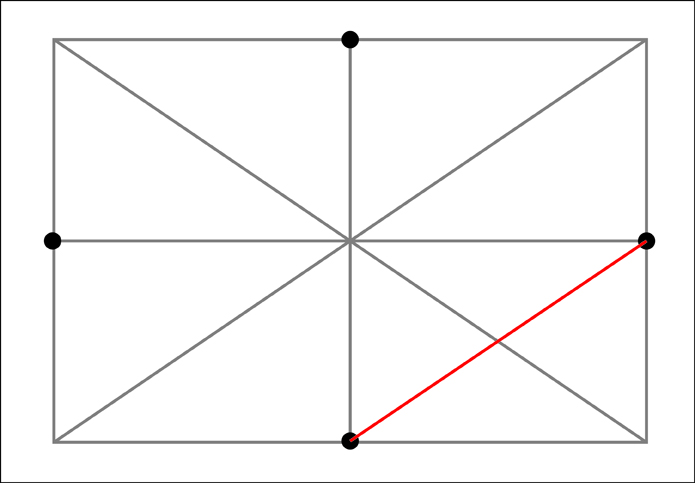


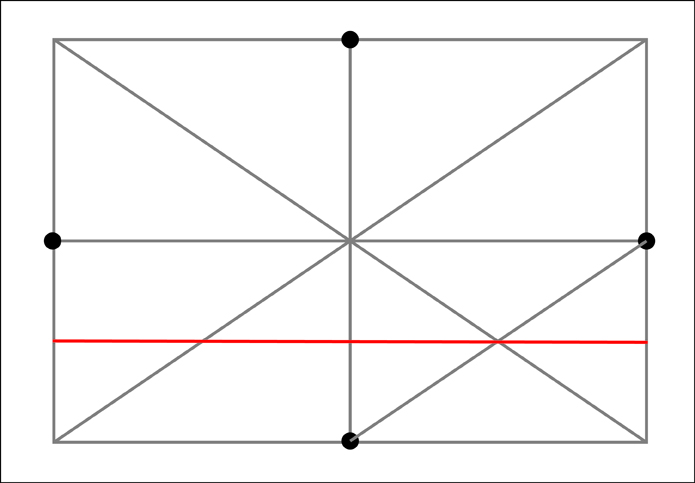
We now have 16 equal sections.  However, before going further let's remove the diagonals used in constructing those sections to keep things from getting too visually confusing.
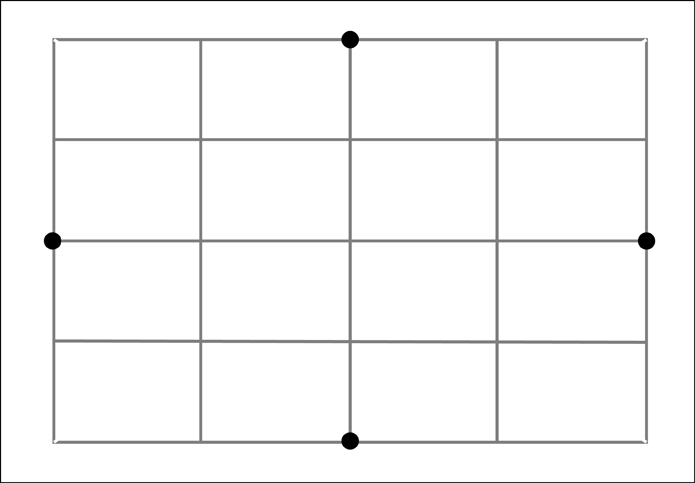

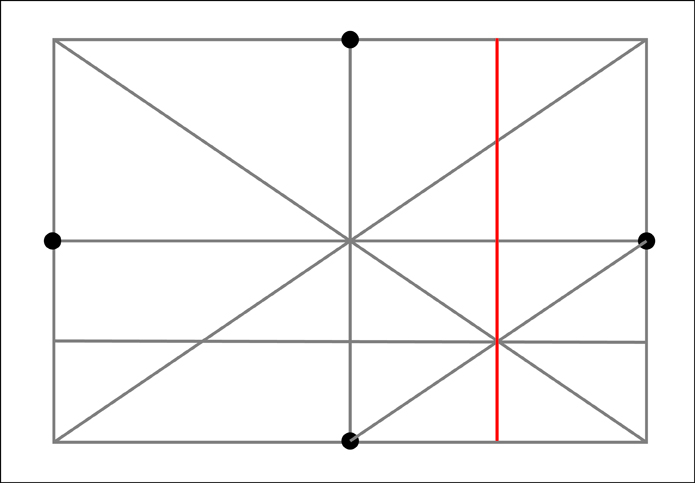
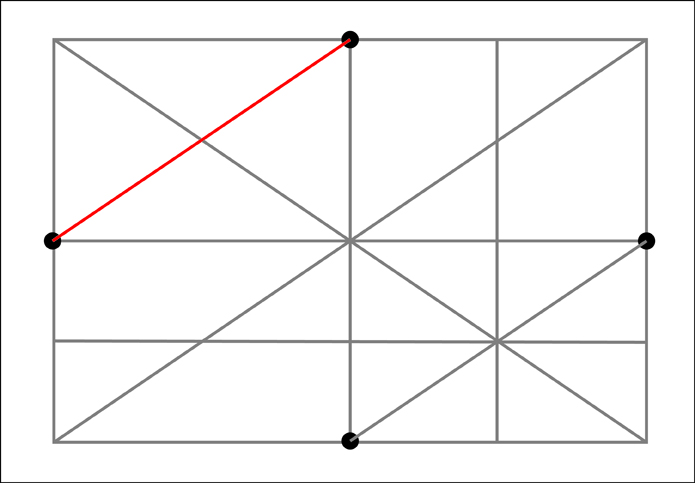
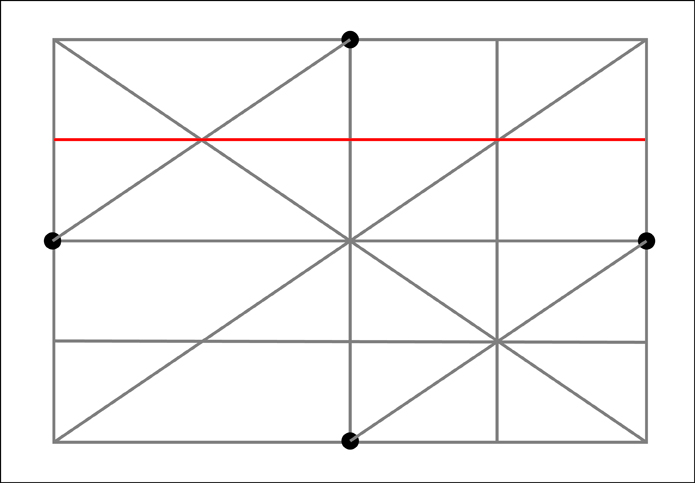
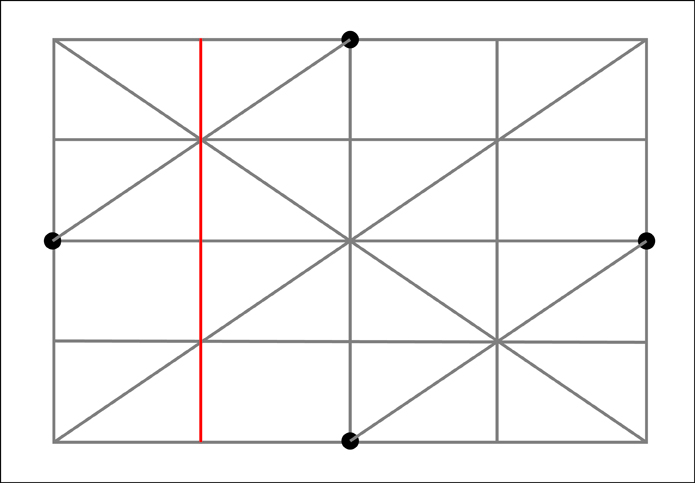
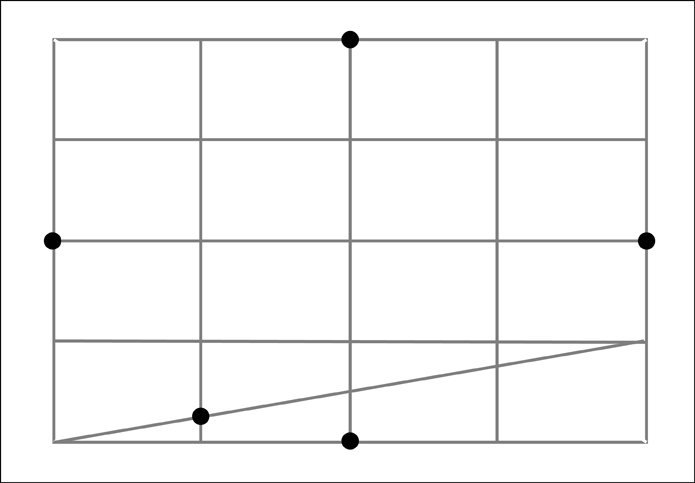
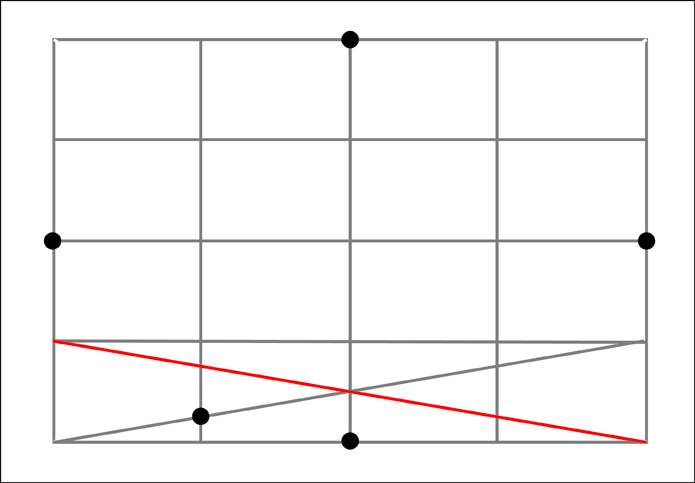
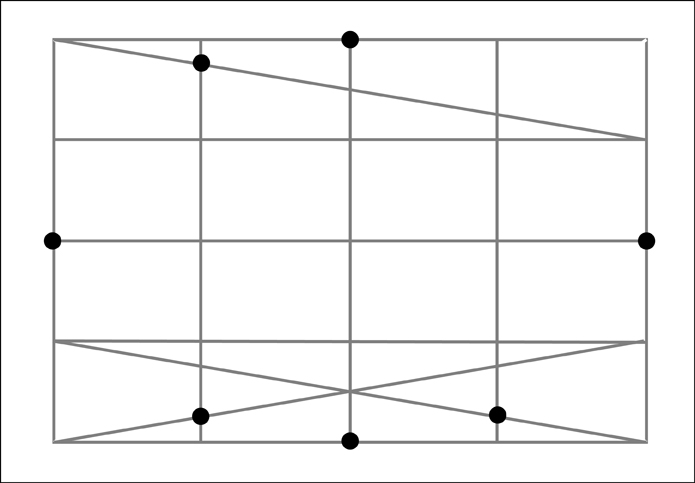
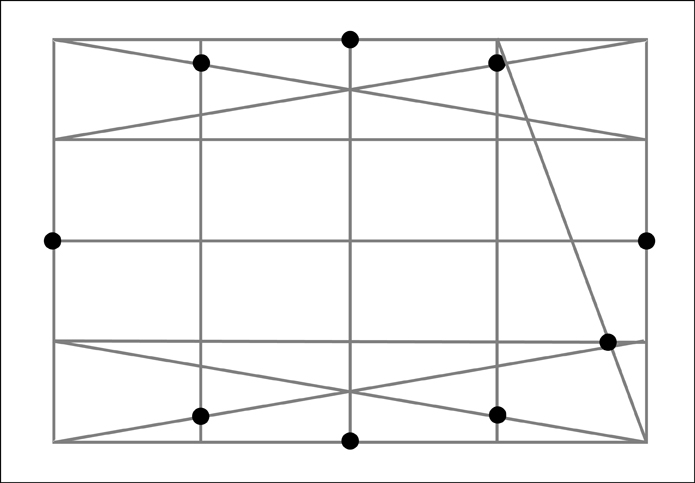
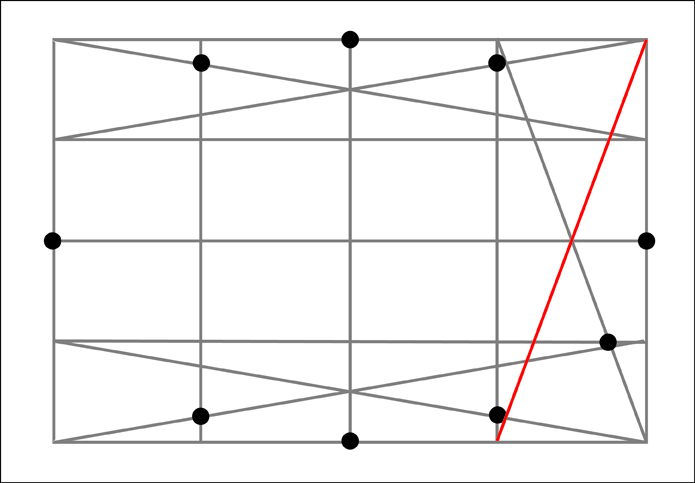
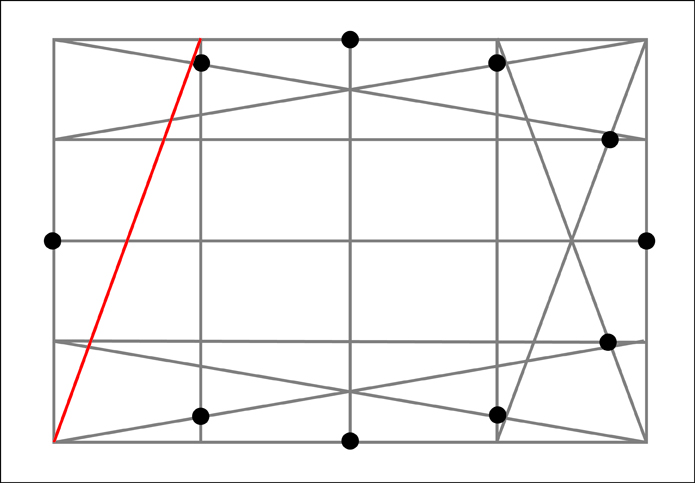
To find the remaining 8 additional points we need to run diagonal lines across the 4 outer sections along each side. Next note where these diagonals intersect the boundaries between the outer four sections of that particular side.  At these intersections, the one that is the closest to the outside of our original rectangle will also mark a point along our ellipse.  Let's start with the bottom section.
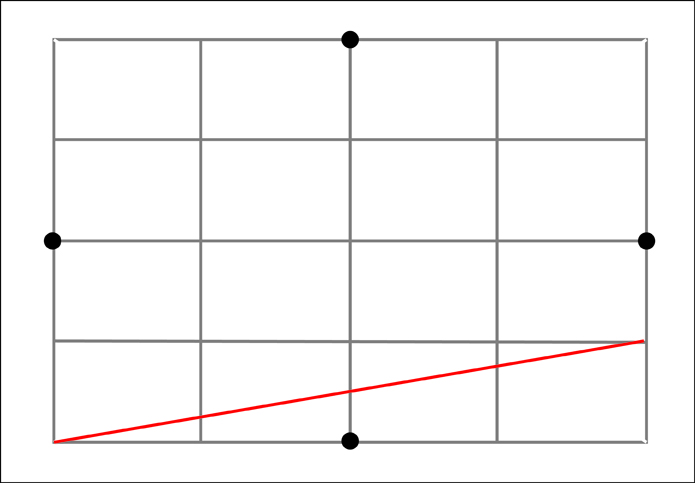

Now for the top section.
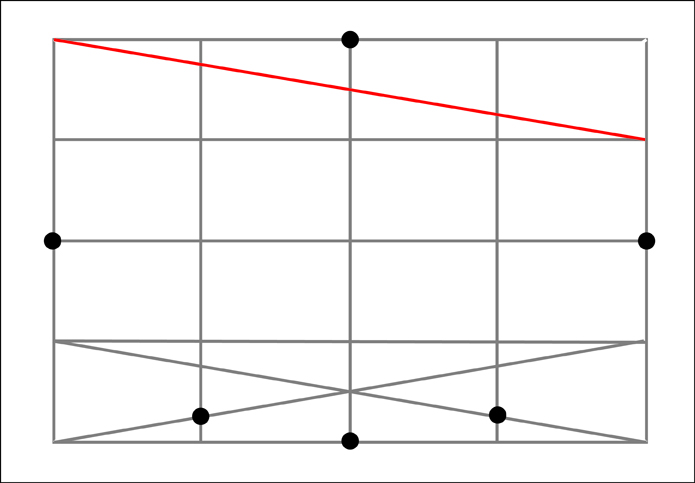

The right section.
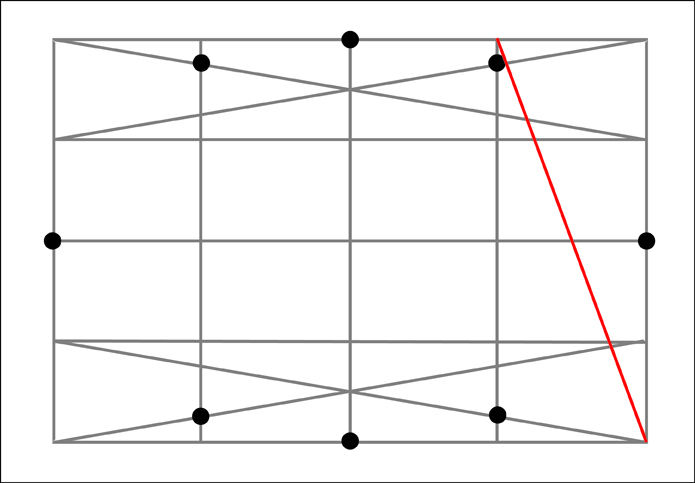

And finally the left section.

Once again, for clarity let's remove the diagonals used to find the additional points.
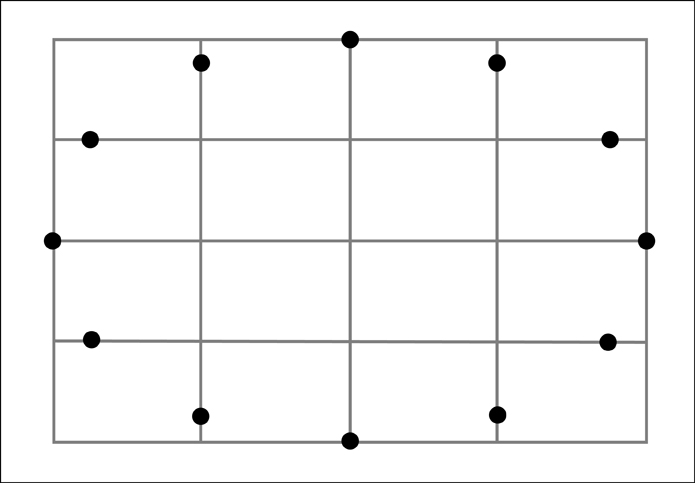

And finally we now have 12 points we can use to aid us in drawing our ellipse!
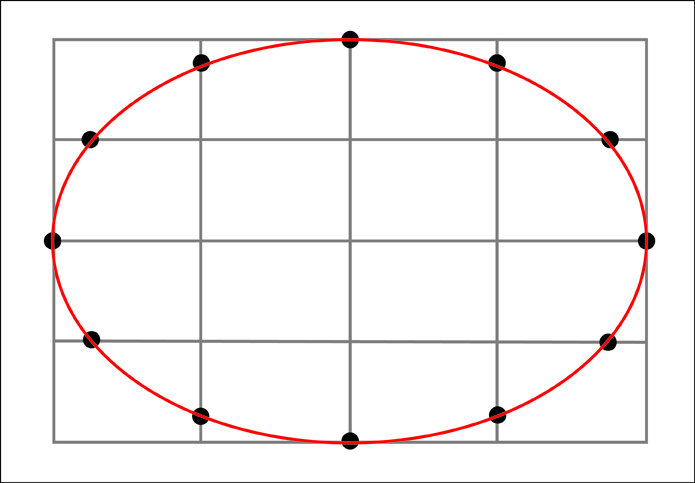

Leaving the picture plane behind, it is useful to know that this same process works just as well to draw ellipses or circles that are in perspective.
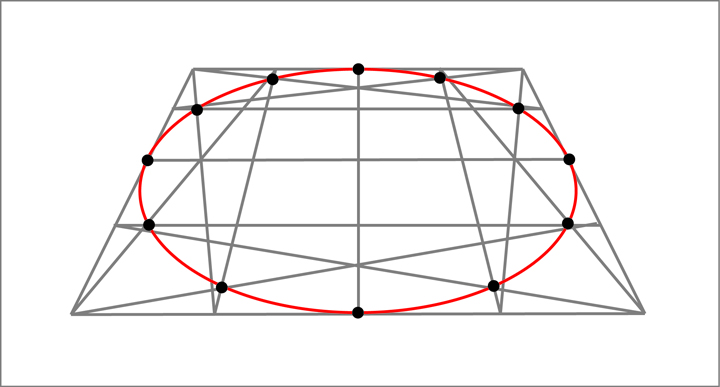

This knowledge has been a resource which I have found very useful in my drawings and paintings.  After a couple of times rehearsing the process it becomes fairly easy to commit to memory.  Additionally, after constructing a number of ellipses in this formal and structured way I suspect that most people will begin to get more accurate results when free-handing them without such a complex framework. 

Going even further, some of you may have already picked up on the fact that the ellipses I have shown in perspective have thus far been in one point perspective with an ellipse that would be directly in front of us (the viewer).   It is interesting to note what happens when the ellipse is moved left or right from this center position. In doing so the major and minor axes of the ellipse (as seen at the picture plane) will begin to rotate.  They do however continue to stay perpendicular to one another.   

There is still plenty more to share on this subject however my busy schedule means that I will have to return to the subject at another time.  Yet I hope some of you will benefit from what I have been able to share.  And as always, thanks for visiting.

Did you enjoy this post?

Join My E-mail List


Thursday, June 30, 2011

Returning to the Blog—A Few New Paintings to Share

Owing to a number of business and personal related obligations I haven't been able to post in quite a few months.  During that time I have received a number of questions that would be great to answer via the blog.  With these in mind, I am hoping to make a return to posting more regularly. 

I thought I would get back into things with a few recent paintings.  The second and third of these were started as demonstrations during workshops I taught earlier this year.  These particular pieces have already found homes with collectors and so are no longer available, however I hope you enjoy getting to see them.

Thanks for stopping by!

 
"Planes" 8" x 16" oil on linen


"Sand Dollars and Glass" 8" x 10" oil on mounted linen


"Apples and Measuring Cups" 8" x 10" oil on mounted linen

Sunday, December 5, 2010

My Studio Lights

I often get regular questions regarding the kind of lighting I use in my studio. At this time I do not have the good fortune to have natural light in my studio. However during my studies I became somewhat accustomed to some of the characteristics of natural light and so a number of years ago I started experimenting with building my own light boxes to try and gain some of those characteristics. After building a few lights a number of other artists who saw them asked about building some for themselves and so I put together a few photos of how they were built. Below is a photo of how I often set up for small still life pieces and some shots that I took while makes changes to one of the lights. I thought I would share the process and the materials involved incase it is useful for others out there. And incase you're not the tinkering type, I also put some links at the end to some lights on the market which may serve you just as well. Have fun taking a look!


Here is the setup I often use for small still life pieces.  The light has a mixture of compact florescent bulbs—usually four 6500K bulbs and one 5000K bulb. 


Photo 1

Photo 2
Photos 1 and 2 show the basic body of the light. This is the first light I built like this and I took these photos while making some modifications to it—upgrading the older design. On this model I used nuts and bolts with lock washers to fasten things together. For future models I used rivets which I would recommend.


The 4 light reflectors are 8 inches in diameter. The aluminum frame was constructed with 1/16" by 1/2" "L" channel lengths of aluminum. The rivets are 1/8" "medium" length aluminum rivets. The basic outer dimensions of the frame are 16" x 16" x 6" (not including the light reflectors).


Photo 3
Photo 3 shows one of the 6" lengths of aluminum.


Photo 4

Photo 5
Photos 4 and 5 show the piece that I fabricated so I could attach a handle. These were attached at the center on two opposite sides of the 16" x 16" frame (side attached to the reflectors).  The piece was cut from an 1/8" thick "L" channel length of aluminum.  It is approximately 2" in length.  The hole has threads that accept a 1/4" #20 bolt.  It was created using a "T handle or a tap wrench" and the correct sized drill bit.


Photo 6

Photo 7

Photo 8
Photos 6, 7 and 8 show a smaller different light I constructed that has a "U" shaped channel (made by adding an extra "L" channel) on three sides. I later decided this was perhaps the best way to go in order to hold the diffusion lens to be made later.   The channel is a gap of about an 1/8th of an inch.


Photo 9

Photo 10
Photos 9 and 10 show an extra center light that I added by cutting down another aluminum reflector.  They also show the start and finish of enclosing the sides and rear openings.  To do this I used aluminum flashing and rivets. On the rear I left the four corner spaces open to allow for air to circulate, helping to dissipate the heat.


Photo 11

Photo 12

Photo 13

Photo 14

Photo 15
Photos 11-15 show the arm handle/bracket that I fabricated so that the unit can be tilted and mounted on a sturdy tripod. Most of the handle/bracket was constructed with 1/8" thick 3/4" "L" channel lengths of aluminum and 1/16" thick 1/2" "L" channel lengths of aluminum for the corner braces. At the ends that attach to the light's frame I drilled 1/4" holes for carriage bolts to go through. I then threaded a 1/4" # 20 carriage bolts through the pieces I had earlier tapped out (to create threads)—adding spacers, washers and large nylon wing nuts which can be tightened down so that the angle of the light can be locked in place.


Photo 16
Photo 16 shows a tapped out hole (to create threads) put at the center of the u-shaped handle/bracket so that the whole unit can be put onto a sturdy tripod.


Photo 17

Photo 18
Photos 17 and 18 show the diffusion lens in place and by itself. I cut it down from a 2' x 2' piece I purchased. I cut the corners off to allow for air to circulate dissipating heat. I also sanded the edges to remove sharp spots and lessen the likelihood of it cracking.

Photo 19

Photo 20
Photos 19 and 20 show the bulbs added and the light sockets attached. I later wired all of the cords together into one plug.

And finally the light in action again! As promised here are some links to some lights that should give a similar result:

http://www.bhphotovideo.com/c/product/479658-REG/Impact_VA903_VA903_Five_Lamp_Fluorescent.html

http://www.bhphotovideo.com/c/product/479659-REG/Impact_VA_905_Cool_Light_IX_Nine.html

Saturday, November 27, 2010

Workshops in 2011

Hi everyone,

For those of you interested, I wanted to go ahead and post the workshops and demonstrations I have scheduled thus far for 2011. As some of you may already know, I also offer private one-on-one workshops catered to an individual participant's particular questions and challenges. For further information on this type of workshop please send me an e-mail at:

workshops@douglasflynt.com

As always to check on workshop updates, read comments by workshop attendees, view online demonstrations, or view recommended books and websites, please visit the following link on my website:

http://www.douglasflynt.com/teaching.html

For those of you that are able to participate in a workshop or attend a demonstration I look forward to seeing you in 2011!

2011 Workshops and Demonstrations:


Demonstration: Portrait with Oils
(for the Portrait & Figure Painters Society of SW Florida, http://www.portraitandfigure.org/)
January 11, 2011, 10:30 am - 1:30 pm
(Cost: $10 members, $15 non-members)
Robb & Stucky Interiors Community Room
13170 S. Cleveland Avenue
Fort Myers, FL 33907


Workshop: Still Life Painting in Oil
February 28 - March 4, March 7 - 11, 2011 (10 day intensive)
(Cost: $875)
Artist's Studio Space
Fort Myers, FL
For more information please click here:


Workshop: Portrait Painting in Oil
March 21 - 25, March 28 - April 1, 2011 (10 day intensive)
(Cost: $975 - includes model fees)
Artist's Studio Space
Fort Myers, FL
For more information please click here:
 

Workshop: Still Life Painting in Oil
Summer, 2011 - exact dates to be announced (10 day intensive)
The Grand Central Academy of Art
New York, NY


Workshop: Portrait Painting in Oil
August 22 - 26, August 29 - September 2 (10 day intensive)
(Cost: Early Registration $1100, Due June 30th, 2011
Late Registration $1200, After June 30th, 2011)
Bay Area Classical Artist Atelier
Belmont, CA
For more information please click here:

Sunday, September 19, 2010

Using a Sphere to Understand Light on Complex Forms

(UPDATE 10/27/11 -For French translation of this post please click "here.")
Recently I received a question that concerns an earlier image I posted awhile back in the article, The Anatomy of Light on Form: Part II. Here is the image:


The question centers around how the use of a sphere, an object so very different from the complex forms of the cast, can help us to better understand how the light on this complex form (or other forms) works. And ultimately how we might utilize this knowledge to assist us in determining values and rendering.

My short answer is, that by understanding how light affects the simple forms of the sphere we can better understand how light affects the forms of a more complex object. However, this answer hardly seems adequate. For this reason I am going to endeavor to break down the connection between a sphere and a complex form further.

To do this, first I would like to start not with forms but with 2-dimentional geometrical shapes. First let's take an odd shape and place it next to a circle.


Let's say that we needed to replace a section of the odd shape's contour with a section of the circle.   In doing so we would find that any section of line (when averaged in our minds to a straight single tilt) from the odd shape has a corresponding section of line or tilt (again when averaged to a straight line) within the circle.  This is assuming that we could not rotate the sections of line if we removed them from their shape. 


It might also be mentioned that although the corresponding sections from the circle may be a close match in terms of their tilt or pitch they might not be the correct scale in terms of their size, this however could be overcome by using circles of different sizes.

So now we realize that a circle, in essence, contains all of the same line segments (averaged in or minds to straight lines), with their unique tilts or pitches, that we would find on a unique shape.

We now need to apply this same concept 3-dimensionally to the sphere and the cast that we originally looked at in our first picture. Instead of considering line segments (averaged to straight lines) we now need to visualize the form of the sphere and cast as averaged to planes. The following image might help you visualize the sphere with planes:


Each plane on the sphere has it's own value in relation to how much light it receives.  Just like with the odd shape and the circle, if we consider the spatial orientation of a plane on the cast and find its corresponding plane on the sphere they both should be the same value (value equating to their pitch or spatial tilt), assuming they both are under the same lighting conditions. 


This can lead us to begin to look less at the optical value of a plane and more at its spatial orientation in relation to a light source.  On a complex form the amount of light a plane receives might be somewhat confusing to interpret but the same plane thought of in the context of a sphere reveals how much light it is receiving quite easily.  Utilizing this conceptualization, it can be easily determined if a plane belongs to a region such as a halftone, or a highlight, not so much based upon its value but upon its orientation in space and context as part of  the sphere. 

For instance in the image of the faceted sphere from earlier, the plane that appears as a highlight is rather obvious.


An artist painting the cast trying to identify highlights might not look for spots of light tone to identify them but instead look for planes that have the same corresponding spatial orientation as the highlight plane on the sphere.


Visualizing a sphere can be a conceptual way of keeping track of the part and the whole while still focusing only on a particular part (or parts) of a complex form. It is often noted that when painting in a "window shade" or "area by area" manner an artist may have a hard time keeping track of large value relationships—a problem of keeping track of the part in relation to the whole. This trouble can be overcome in some respects by conceptually referencing a real or imagined sphere under the same lighting conditions and then comparing planes from the object to the corresponding planes on a sphere. This is not entirely dissimilar from taking a road trip and tracking your progress on a map to maintain a sense of where you are, where things are in relation to you, and how much further you have to go.

Comparing two planes on the cast and then analyzing both on a sphere can also be a great way to compare their relative spatial relationships to aid in assigning them relative values. For instance two planes facing very much toward the light on the cast might appear to be almost the same value. However if you wish to make a very subtle distinction between them you could easily decide which is lighter and which is darker by plugging them both into a sphere and seeing which one receives more light. It might also be noted that despite one being darker than the other neither can get very dark in value because they are both very much out in the light and a great deal of planes exist on the sphere between them and the darker planes of the half tones.

These kinds of conceptual thoughts using a sphere can allow for very subtle distinctions between tones that optical assessments alone might not allow for.

This all leads back to my original explanation for using a sphere, where I stated that by understanding how light affects the simple forms of the sphere we can extrapolate to better understand how light affects the forms of a more complex object. As with many of the subjects that I have written about on this blog this line of thought could be explored in a much more full and robust discussion—but alas, my schedule doesn't permit me to do so.

Yet perhaps the next time you're painting an object you might just think about a sphere along side it and see if you begin to understand things differently, and consequently "see" in a slightly different way than perhaps you did before.

Thanks for taking a look!


Saturday, August 21, 2010

DIFFUSE TRANSMISSION AND TASTING THE RAINBOW

(UPDATE 10/27/11 -For French translation of this post please click "here.")  
 
DIFFUSE TRANSMISSION

I have had a few requests to discuss how "diffuse transmission," which makes up the appearance of translucency, works.

Because I paint a great variety of materials in my still life work I encounter diffuse transmission quite regularly—perhaps in the light passing through milk (Figure1) or the light passing through the thin wall of a shell (Figure 2). However I also encounter it when doing figurative work and this seems to be where many people really take notice of it's effect—perhaps when looking at the intense high chroma reddish, orange seen in the ears of a person who is backlit.


Figure 1.  Black and White 8" x 6" Oil on linen


Figure 2.  Understanding Phi 10" x 16" Oil on Linen


As its name implies diffuse transmission deals with the diffuse component of light. And because this light has passed through the object it is described as "transmission." Diffuse transmission is composed of light that has entered a material, undergone subsurface scattering (losing wavelengths to absorption in the process) and then has been emitted back out of the material on the shadow side of the object. It is actually the same process as "diffuse reflection" except that the light has exited the material on the shadow side, instead of the light side, of the object. For this reason we should expect to observe diffuse transmission mainly on the shadow side of an object. On translucent materials that have some substantial thickness (such as a sphere vs. a sheet of paper) the diffuse transmission will appear just past the terminator or shadow line.

In terms of its affect on the appearance of color, diffuse transmission is usually darker in value than what is seen on the light side of the same object. This is due to the loss of light through absorption as the light passes through the object. However it will be higher in chroma than the color found on the light side of the object. This is because only certain wavelengths were absorbed, in effect filtering out some wavelengths while allowing others to pass through. It has been my experience that there may also be some shift of hue (often very slight) from what the local color appears to be on the light side of the object. Sometimes this may be because as the light travels through the object it encounters different layers of materials (each material absorbing different sets of wavelengths. However, I have often wondered if there are also other factors at work, based more on our perceptions with different relative proportions of wavelengths stimulating the eye differently—however that is something to be contemplated further at another time.

TASTING THE RAINBOW

For a greatly simplified analogy, to understand what has already been stated, lets say I find myself with a huge bowl of Skittles candy that represents a certain quantity of light. Each candy with its own color might be a particular photon with a particular wavelength. I am standing on a stage in a filled auditorium with the audience representing all of the atoms that make up a particular object. In this analogy each person in the audience only likes a particular color of candy but for some reason no one in the room likes green.

A Bowl of Light

I begin to toss out handfuls of Skittles to the first row which they proceed to eat assuming they get the color of candy they like. If they don't like the color or they are currently eating a piece, they can pass it on to someone else. However they can only pass a Skittle on 10 times. If no one eats it in that time they proceed to toss it back up onto the stage. This candy on stage makes up diffuse reflection. There is less candy than what we started with (hence less light) and although some of all of the colors should end up back on stage the proportion of green Skittles should be much greater (giving the appearance of green).


Diffuse Reflection

After all the leftovers are back on stage the audience having just started to work up a sugar high demands an encore! Not wanting to disappoint them I break open some new bags of skittles filling back up the bowl and start the process over again. However realizing that many people in the rows further back never got any candy the first time I allow them to pass on the candy 50 times. This time if no one eats it I ask them to toss the leftovers toward the lobby entrance in the rear of the auditorium. This time the candy left here makes up diffuse transmission. There is a lot less candy than what we started with (hence even greater loss of light) and a very large proportion of green Skittles (giving the appearance of a very high chroma green)


Diffuse Transmission

CONCLUSION

Very often the phenomenon of diffuse transmission causes us to see beautiful glows of high chroma on an object or in spots throughout a scene. Accurately understanding what is occurring helps in capturing these glows with paint ( through "relative" relationships of color or "absolute" color matches). Getting this effect right communicates to the viewer the type of material being represented, giving a "truthful" or "realistic" effect and can also be beautiful in an aesthetic sense at the same time.

Thanks for taking a look!